
01302 203 888
Free Delivery on all orders

In this article, we will describe in detail how to change a car tyre using an automatic tyre-changing machine or semi-automatic tyre changer.
You need to first understand the 2 main types of automated tyre machines for changing car tyres.
The process for changing tyres on each of these machines is similar but does differ slightly, especially when removing or re-installing the bead of the tyre on the wheel rim, and these are referred to within the article.
Please ensure you know what kind of tyre changing machine you have, and that you have the correct appropriate training and experience before operating a tyre machine in a commercial garage, tyre fitting business or MOT testing station.
If you prefer to learn by watching, watch Michelle Westby demonstrate how to change a car tyre on a steel wheel rim using a car tyre changer from Concept Garage Equipment.
Practice safety first at all times when using professional tyre fitting machines and indeed any garage equipment, as the torque and pressure these can exert can cause serious damage to wheels, tyres or to the person operating it, if not used correctly.
Below we describe how to prepare the wheel prior to removal of the tyre, including correct procedures for removing the valve and using a tyre changer to break the tyre bead, as well as how to remove the tyre and then reverse the process to replace the tyre, apply a new valve or valve core, seat the bead and re-inflate the car tyre.
If you are removing or replacing tyres to allow wheels, ensure alloy wheel protectors are fitted to the tyre machine prior to starting to use the tyre changing machine. These may be fitted to the mounting head, mounting jaws and bead breaker shovel and may have come as an optional extra with your tyre-changing equipment.
If you are working on a steel wheel and this wheel has weights attached to the edge of the wheel rim, then these need to be removed using a set of tyre pliers first, otherwise, these can be dragged around the wheel rim during the tyre removal and will likely damage the wheel and could damage the tyre also.
Simply part the wheel weight pliers, to grip the edge of the wheel weight that is clamped onto the wheel rim.
Tighten the wheel weight pliers onto the wheel weight, and then pull forward towards the centre of the wheel rim, and this steel wheel weight should become detached relatively easily.
Please note, you may have wheel weights on one or both sides of a wheel rim that would need to be removed before changing the tyre.
First, remove the valve cap and unscrew and remove the valve core to release all the air from the tyre. You will use a valve core removal tool to do this. Removing the air will help to prevent any tyre explosion or damage when the bead is broken.
Place the edge of the tyre into the bead breaker ensuring that the valve is pointing upwards, to avoid damaging any TPMS sensors that may be inside the tyre (either connected to the inside edge of the valve, connected to the rim itself, or potentially on the opposite side of the rim from the valve).
Apply the bead breaker shovel to the edge of the rim, about 10-20mm away from the tyre rim is a safe distance.
You must ensure that the bead breaker does not sit over the rim as this would damage the wheel itself.
Break the bead on both sides of the tyre using a bead breaker, by pressing the pedal on the tyre machine, this pedal is usually towards the right side of the tyre machine closer to the bead breaker shovel (but please check this is the case on your tyre machine). Check at the bottom of this blog post for a reference to what the pedal labels may look like.
It’s good practice to break the bead on one edge, spin the tyre on its axis by 180 degrees and break again, before flipping the wheel around and doing the same on the reverse side of the tyre.
Following the tyre bead being broken, the inside edges of the tyre should be visibly closer to the centre of the rim on both sides and no longer attached to the edge of the wheel rim. Checking this will confirm that the bead has been correctly broken and the tyre is ready to be removed using the tyre changer.
Use tyre soap on both sides of the tyre around the wheel rim prior to removing the tyre, as this reduces friction and reduces damage during removal. Avoid getting tyre paste inside the tyre or excess paste on the inside of the wheel rim.
Ensure the mounting head arm is tilted backwards (on an automatic tyre machine), or to the side (in the case of a semi-automatic machine), out of the way initially of the turntable.
Lift the wheel onto the turntable and clamp it securely in place using the clamping pedals. Adjust the clamping jaws and position the wheel into place centrally on the tyre changer turntable, with the jaws just on the outside of the rim (if they clamp on the outside) or just inside the lip of the rim (if they are being used to clamp inside the rim).
Before removing the tyre, use wheel balance removal pliers to remove any wheel weights. This protects the tyre changer head from damage during operation.
Position the pressing arm (if one is available) to press the centre of the wheel down onto the turntable, or otherwise, you can hold the wheel firmly in place by hand.
Press the pedal again to adjust the jaws, to clamp the wheel rim firmly in position on the turntable (again these can clamp inside or outside of the rim depending on the machine and size of the wheel, so ensure you know which way the jaws need to move before adjusting them).
Raise the pressing arm (if one was used) now that the wheel is in place and the tyre is ready to be removed from this side of the tyre, move this to the side out of the way.
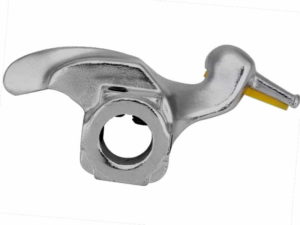
Tilt the tyre mounting head arm forwards, and be aware of the attachment at the end of this as it comes closer to the wheel and tyre – this is sometimes referred to as the Tyre Changer Demount Duck Head, due to its shape.
Position the mounting head arm by pressing the pedal, or by swinging in from the side of the machine (for a semi-automatic tyre machine) the end of the mounting head should be adjusted to sit against the edge of the wheel rim and just touch the tyre, this will ensure no damage to the rim whilst the tyre is being removed and this reinforces why it’s essential to use the correct fitting for alloy wheels.
On a semi-automatic tyre machine, you may have a control knob at the top of the mounting arm to position the mounting head into the correct place, and a locking mechanism to keep it there. On a fully automatic tyre machine, this is taken care of as part of the tilt action automation controlled by the foot pedals, though there may be additional controls to lower and raise the end of the mounting head to get the positioning perfect for each rim and tyre size.
Insert the tyre lever or tyre iron inside the edge of the tyre, and rest against the mounting head for leverage to bring the edge of the tyre just above the rounded end of the mounting head. Tyre levers often have 2 differently shaped ends, so use the end that fits and works best for you.
Rotate the tyre changer turntable to detach the top bead. As the tyre is sitting on the mounting head, this will do the hard work to remove the rest of the tyre bead from the rim.
Position the tyre lifting disc beneath the underside of the tyre if you have one fitted to the tyre machine, or you can use your hand to do this, and lift up steadily to bring the lower bead of the tyre towards the top of the rim ready for removal also.
Now you will repeat the process for the lower bead of the tyre, to raise this from the tyre rim also.
Insert the tyre lever or tyre iron under the bottom bead of the tyre, and rest against the mounting head for leverage to bring the lower edge of the tyre just above the end of the mounting head or duck.
Rotate the tyre changer turntable to detach the bottom bead. Again the mounting head will do the work to remove the rest of the tyre bead from the rim, but if necessary use the tyre iron to help this process to get started.
If this is an automatic tyre machine, then press the button to raise the mounting head, and the pedal to tilt the tyre machine mounting head arm back on the tyre changer and out of the way of the turntable. Now you can remove the tyre from the tyre-changing machine.
Rotate the wheel to make the valve accessible. Carefully cut and remove the old valve and dispose of it correctly. Whenever a tyre is replaced, it is best practice to always fit a new valve. Take a new valve, remove the valve cap and apply tyre soap. Using a valve puller tool, pull the valve through the rim until it clicks into position. Always visually check that the valve is fully seated and secure against the rim.
Inspect the tyre and wheel rim to ensure they are clean and free from damage before mounting the tyre onto the rim.
Check or replace the TPMS valve, TPMS valve core or TPMS sensor if these were damaged during tyre removal, or the batteries have expired.
Lubricate the tyre bead on both sides to aid the mounting of the tyre and also to help seal the tyre bead once fitted to the wheel to prevent air leakage.
Ensure the mounting head arm is tilted backwards (on an automatic tyre machine), or to the side (in the case of a semi-automatic machine), out of the way of the turntable initially.
Check that the wheel rim is still securely clamped in place on the tyre changer turntable.
Place the tyre on top of the wheel rim. It’s helpful to tilt the tyre forwards at an angle for the initial mounting of the lower bead of the tyre.
Tilt the tyre mounting head arm forwards by pressing the pedal, or by swinging in from the side of the machine (for a semi-automatic tyre machine) the end of the mounting head should be adjusted, to sit against the edge of the wheel rim and just touch the tyre, this will ensure no damage to the rim whilst the tyre is being mounted. If you have just removed the tyre from this wheel rim, it’s likely that the settings are still correct, but always best to check anyway.
On a semi-automatic tyre changer use the locking control knob at the top of the mounting arm to position the mounting head and lock it into the correct place. On a fully automatic tyre machine, this is taken care of as part of the tilt action automation controlled by the foot pedals, though there may be an additional button or level controls to lower and raise the end of the mounting head to get the positioning perfect for each rim and tyre size.
Bring the front lower bead of the tyre up to meet the underside of the tyre mounting head, or duck (over the tail and under the head of the duck).
Rotate the tyre changer turntable and at the same time pull the outer edge of the tyre towards you to mount the lower bead of the tyre. The mounting head will now do the work to mount the lower bead of the tyre.
Once the tyre begins to mount, ensure all tools, hands and fingers are clear of the tyre, to ensure these are not trapped between the tyre and the wheel rim.
Now repeat the process with the upper edge of the tyre. Hook one edge of the upper tyre wall over the edge of both the tyre and the mounting head or duck, then lift this up to meet the underside of the tyre mounting head, or duck (over the tail and under the head of the duck).
Position the roller below and just to the side of the mounting head and depress the opposite side of the tyre with the pressing device which then rotates with the tyre.
Rotate the tyre changer turntable and at the same time, the roller and pressing devices will ensure the opposite edge of the tyre does not pop off as the pressure increases towards the end of the bead mounting process.
The mounting head will now do the work to mount the lower bead of the tyre.
If your tyre machine does not have a roller or pressing device then you can use your fist knuckles to hold the opposite edge of the tyre in place, but be careful and keep all fingers clear of the edge of the tyre and rim. As the tyre is around 50 percent mounted, you should further push the tyre onto the rim towards the middle of the rim, to give enough slack for the final half of the tyre to fit onto the rim without undue pressure on the bead, otherwise, this could potentially damage the tyre.
Fully rotate the turntable to mount the top bead of the tyre onto the wheel rim
Due to the forces in the tyre rubber during the mounting of the final tyre bead, if anything begins to slip or get trapped, simply stop, reverse if necessary, re-apply the tools to the tyre at the correct places and then continue or re-start the tyre mounting process.
If this is an automatic tyre machine, then press the button or lever to raise the mounting head, and the pedal to tilt the tyre machine mounting head arm back on the tyre changer and out of the way of the turntable.
Press the pedal on the tyre changer to open the clamping jaws, remove the wheel with a newly fitted tyre from the tyre changer turntable, and then place it down again on the turntable but clear of the jaws, as these would prevent the bead from sealing.
Alternatively, the wheel can be moved away from the tyre machine and tyre inflation can be done on a separate machine or workbench.
Ensure the valve core or valve stem is still removed from the valve, to ensure as much air can enter the tyre as quickly as possible to help seat the bead of the tyre.
Use a tyre inflation tool, ideally using compressed air, attached to the valve to inflate the tyre. As you inflate the tyre you may hear one or more pops as the bead re-seats to the wheel rim. Keep all fingers and tools clear of the wheel rim and ensure nothing is trapped in between the tyre and rim at this point.
Remove the tyre inflation tool and some air will be released from the tyre.
Use a valve core tool to screw a new valve core into the valve on the wheel rim, and the tyre is now ready to be inflated. Do not over-tighten the new valve core into the valve, it only needs to be finger-tight using the core tool.
Ensure the bead has been properly seated against the tyre rim.
Make sure the valve is fitted and seated correctly, remove the valve cap and ensure that a new valve core has been fitted into the tyre valve and tightened appropriately.
Inflate the tyre to the correct tyre pressure.
Now re-fit the valve cap.
If you are considering the purchase of a new Tyre Changer or Tyre Machine Package and need any advice, help or finance to do so, please give our sales team at Concept Garage Equipment a call first. We can advise on the best and most appropriate Tyre Changing equipment to purchase and can also advise on or supply tyre-fitting training for you and your staff.
We can offer you advice over the phone at 01302 203 888, we have helped to advise, build, and set up hundreds of Garage and MOT Bays across the UK and we have a huge range of garage equipment and tools. All product prices include delivery as well as free advice on the best use of the tyre fitting equipment, up to full MOT Bay packages and MOT Bay installation.
Call us today on 01302 203 888 or use the website contact form today, we are here to help.


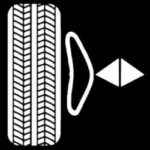

Note: The pedal symbols may differ from one tyre machine to another, these are an indication of the types of pedal symbols you may encounter.